

Moderation on a DZSERVERS.HOST server lives in two tabs. RCON opens a live BattlEye console with a Players Online panel, where you kick, message or ban whoever is connected this second. Players holds the durable lists — Bans, Whitelist and Priority — which the panel writes into your server’s own ban.txt, BattlEye bans.txt, whitelist.txt and priority.txt and re-applies on every sync and every start.
The rule of thumb: reach for RCON when someone has to be off the server right now, and for the Players lists when the decision has to still be true after the next restart. This guide covers both halves in that order.
Before you start
- The right permissions. Use RCON renders the RCON tab, View players renders Players, and Manage bans & lists is what lets you create or revoke anything. Owners have all three; sub-users get what you grant under Members.
- A running instance for anything live. BattlEye’s RCON port only answers while the server process is up, and that port is always your game port plus three.
- An admin and RCON password already saved in Instance Settings — the node reads it back out of the server’s BattlEye config to authenticate. See getting started with the control panel.
1. Connect the RCON Terminal and read Players Online
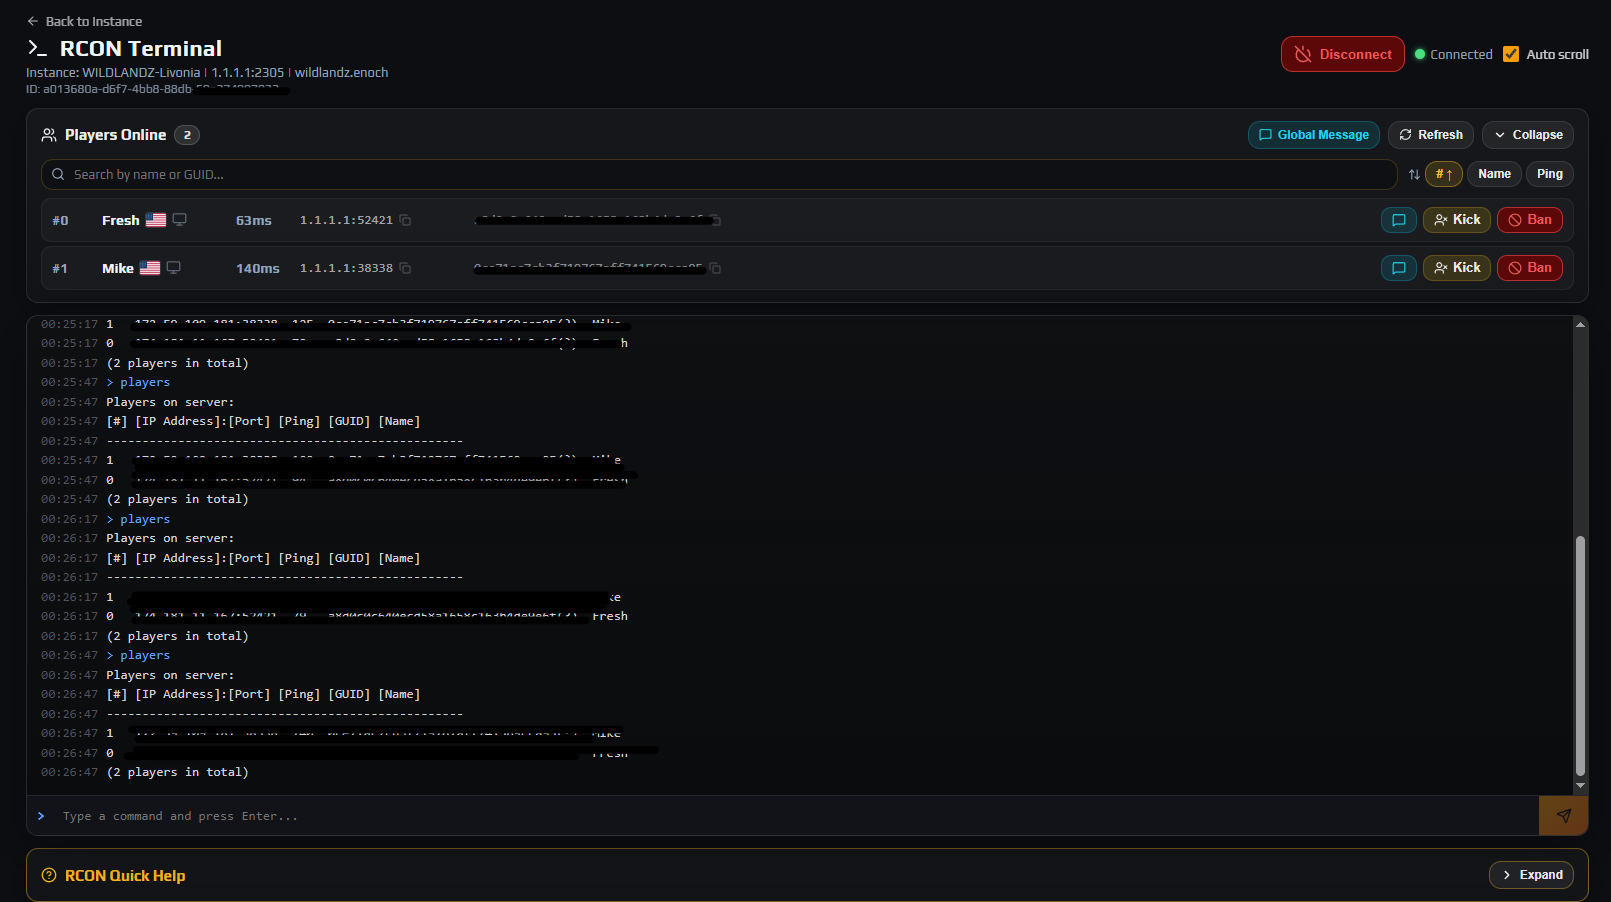
Go to Instances → your instance → RCON. The page is headed RCON Terminal with the instance name, its RCON endpoint and the mission underneath, and it tries to connect on its own as soon as it loads.
Top right are the session controls: Connect RCON, which becomes Disconnect once a session is live, a coloured dot reading Connected or Disconnected, and an Auto scroll checkbox. A Hub: disconnected badge means your browser has lost its live link to the panel, not that RCON has dropped.
Below sits Players Online with a live count, plus Refresh, Global Message and Collapse. It refreshes itself on connect, every 30 seconds, and about a second after any join or leave line scrolls past.
Each row starts with the session number, shown as #12 — that is what kick and ban target, and it is reassigned every time the player reconnects. Then the name with a country flag, a platform icon (PC or Console (Xbox)), the ping, and finally IP:Port and the 32-character BE-GUID, which copy to your clipboard when clicked. Console players report no ping, so their cell reads N/A.
The Search by name or GUID... box filters the list; the #, Name and Ping buttons sort it, and clicking the active one again flips the direction.
Note: Connect RCON to see the player list. means there is no session. No players online, or waiting for data... means the session is up but the first response has not landed — give it a few seconds.
2. Kick, message or ban a connected player
The row buttons open small panels rather than firing immediately, so there is always a moment to check you picked the right row.
Kick. Kick Player confirms the name and session number and offers one Reason (optional) field, defaulting to Kicked by admin. It is instant, the reason is shown to the player, and nothing stops them reconnecting a second later — a kick breaks up a situation, it does not end one.
Message. The message icon sends a private line to that session; Global Message sends one to everybody. A warning delivered in-game settles most problems without a ban.
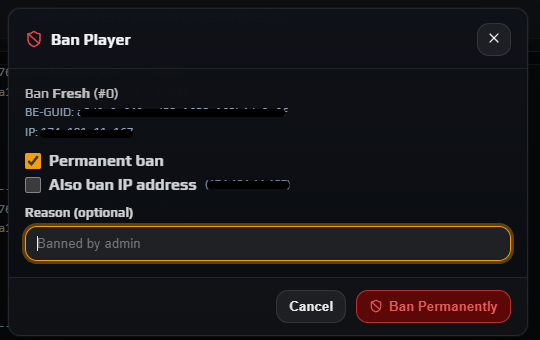
Ban. Ban Player shows the BE-GUID and IP for confirmation, then offers:
- Permanent ban — leave the checkbox clear and the duration controls appear.
- Also ban IP address — a checkbox showing the exact address it would use.
- Hours or End Date — Duration (hours) converts what you type into minutes and days as you go; Ban expires at will not accept a moment less than five minutes away.
- Reason (optional) — defaults to
Banned by admin.
The confirm button reads Ban Player, or Ban Permanently when the checkbox is ticked.
Note: This is not the raw BattlEye ban command. It creates a tracked entry in Players → Bans, writes the enforcement files and issues a live reload so BattlEye kicks the player by itself — which is why the ban is still there, reason and expiry intact, after the next restart. It needs the Manage bans & lists permission, which the panel names in the failure message if you lack it.
Careful: Think twice about Also ban IP address. Household members and anyone behind a mobile or carrier-grade NAT connection share addresses. Ban the identity first; add the IP only for someone who has already come back on a new account.
3. Type commands yourself, and know what the panel will not see
The input bar takes anything BattlEye accepts, with Up and Down cycling your recent commands, and recent output reloads when you return to the page. RCON Quick Help at the foot of the page expands to a reference of exactly eight commands:
players                                  All currently connected players.
commands                                 All available BattlEye RCON commands.
say -1 <message>                         Broadcast to all players.
kick <playerId> <reason>                 Kick by session/player id.
ban <player#> [minutes] [reason]         Ban a connected player's BE-GUID.
                                         0 or omitted = permanent.
addBan <GUID or IP> [minutes] [reason]   Ban a GUID or IP even if not connected.
removeBan <ban#>                         Remove a ban by its number.
bans                                     List all current BE server bans.
Two need care. ban takes the session number from Players Online, not a GUID, so it only reaches someone currently connected; addBan is the one that works on an absent player. removeBan takes a position in the list bans prints, and those positions shift as bans come and go, so run bans immediately before it.
The real difference is bookkeeping:
| A typed RCON ban | A panel Bans entry | |
|---|---|---|
| Stored in | BattlEye’s own bans.txt. | The panel database, then ban.txt and BattlEye bans.txt. |
| Visible in the panel | Not until you run Import existing. | At once, with reason, expiry, status and time added. |
| Undoing it | removeBan <ban#>, and the numbers renumber underneath you. | An Unban button; the entry stays readable under Show revoked. |
| Your other servers | Not applied. | Apply to other instances copies it across. |
| Server offline | Nothing to send. | Files are still written and read at the next start. |
Careful: A ban you type by hand is real — BattlEye enforces and stores it — but the panel had no part in it, so it has no reason, no readable expiry and no name against it. Syncs preserve lines the panel did not write, so nothing gets clobbered; but if moderation has been happening in the console, run Import existing once to pull that history in.
4. Open the Players tab and adopt the lists already on disk
Go to Instances → your instance → Players. Six tabs run across the page — Online, All Players, Sessions, Bans, Whitelist, Priority — and it opens on All Players. Above them a status band gives the active ban, whitelist and priority counts, any pending sync and failed counts, and Last sync:.
Sync now rewrites the list files on the node immediately. Import existing does the opposite: it reads the server’s ban.txt, BattlEye bans.txt, whitelist.txt and priority.txt, plus the live ban list over RCON, and adopts anything the panel is not already tracking.
If nothing has ever been imported, a banner says so and offers Adopt existing lists. Do that first on any instance with history — one you migrated in, or one moderated from an external tool. The confirmation, headed Import existing lists?, spells out that nothing is deleted.
Note: Adoption is one-way and safe. Imported rows carry an imported: file badge so you can tell them apart, and a sync never removes a line the panel did not write.
You rarely need Sync now by hand: every create, edit and revoke queues its own sync, and one is queued just ahead of every server start so the engine boots with current lists. Use it after editing a list file directly over SFTP, or when a node problem has left entries showing Pending.
5. Work the roster: identities, sessions and one-click actions
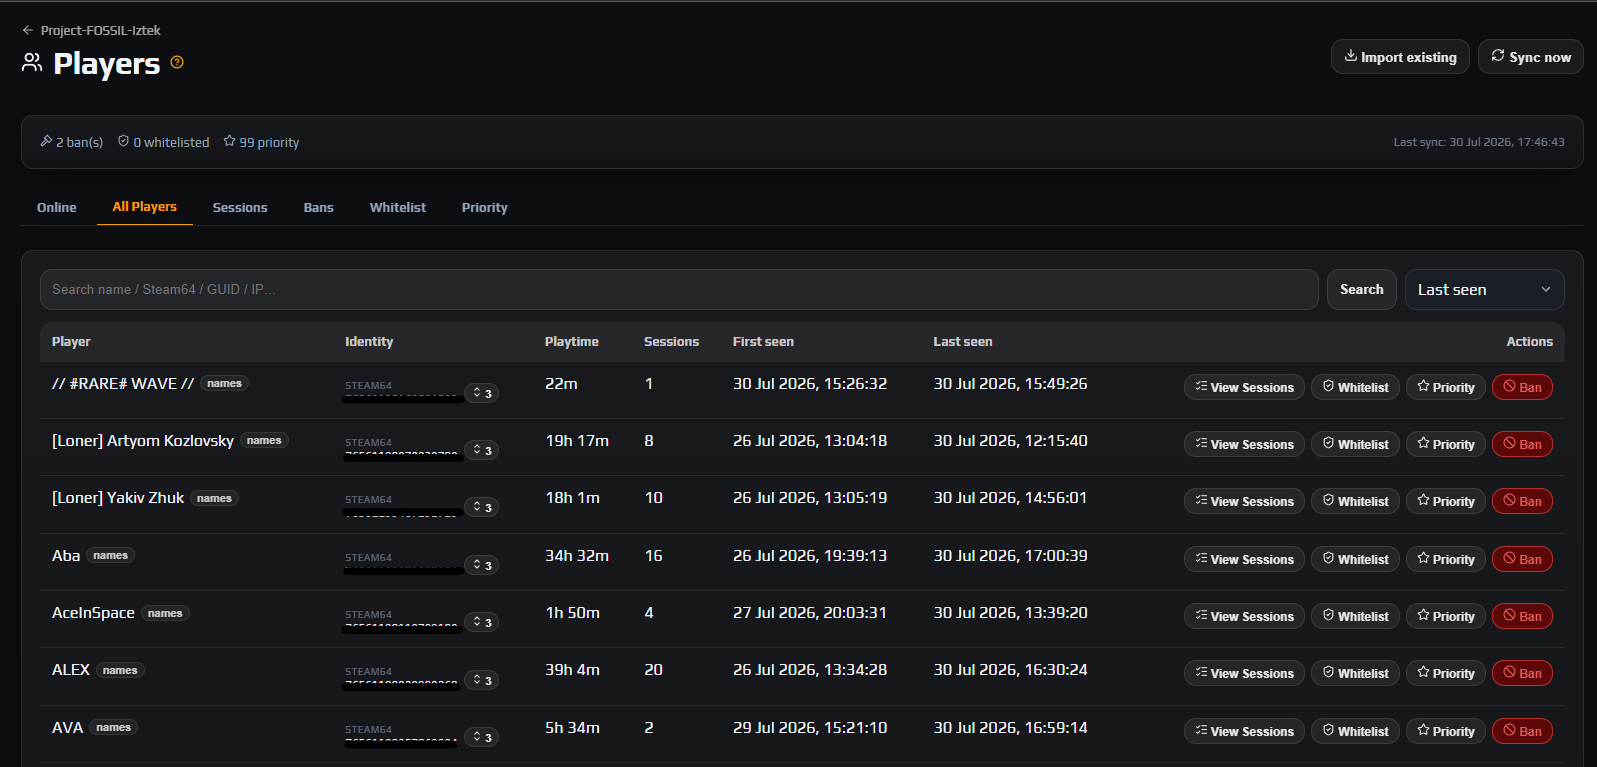
All Players is everyone who has ever connected; Online is the same table filtered to who is on now. Columns are Player, Identity, Playtime, Sessions, First seen and Last seen. Search with Search name / Steam64 / GUID / IP…, sort by Last seen, Playtime or Name, and page through 25 at a time.
The Player cell shows a green dot while the player is connected and a names button holding their alias history. Identity shows the strongest ID on file, correctly labelled, with an expander revealing the rest and a copy button for each:
- Steam64 — the 17-digit Steam ID. BattlEye’s GUID is derived from it, so this alone is enough to ban, whitelist or grant priority.
- Bohemia UID — what the engine writes into
whitelist.txtandban.txt. Console players may have this without a Steam64. - BE-GUID — the 32-character hash BattlEye enforces on, and the only identity a raw RCON ban gives you.
View Sessions switches to Sessions for that player, listing Started, Ended, Duration, IP and Ping (avg / peak) newest first. That is where you settle an argument about whether someone was online when a base was raided.
With Manage bans & lists every row also carries Whitelist, Priority and Ban. Priority is greyed out for anyone the panel has not yet seen a Steam64 for, and both quick-adds confirm first, explaining what the list does before writing anything.
Ban here opens the fuller panel: Permanent ban starts ticked, and instead of one IP checkbox you choose Don't ban IP, Latest IP or All known IPs — the last counts the distinct addresses across every server you manage and writes one entry per address.
Careful: All known IPs can mean a lot of entries, each revoked separately afterwards. On a long-standing player, Latest IP is almost always the right answer.
Note: The same ban panel opens from the Live Map, whose Kick button hands you to the RCON tab with that player already filtered in Players Online — see the live player map.
6. Manage the Bans list: surfaces, status and other servers
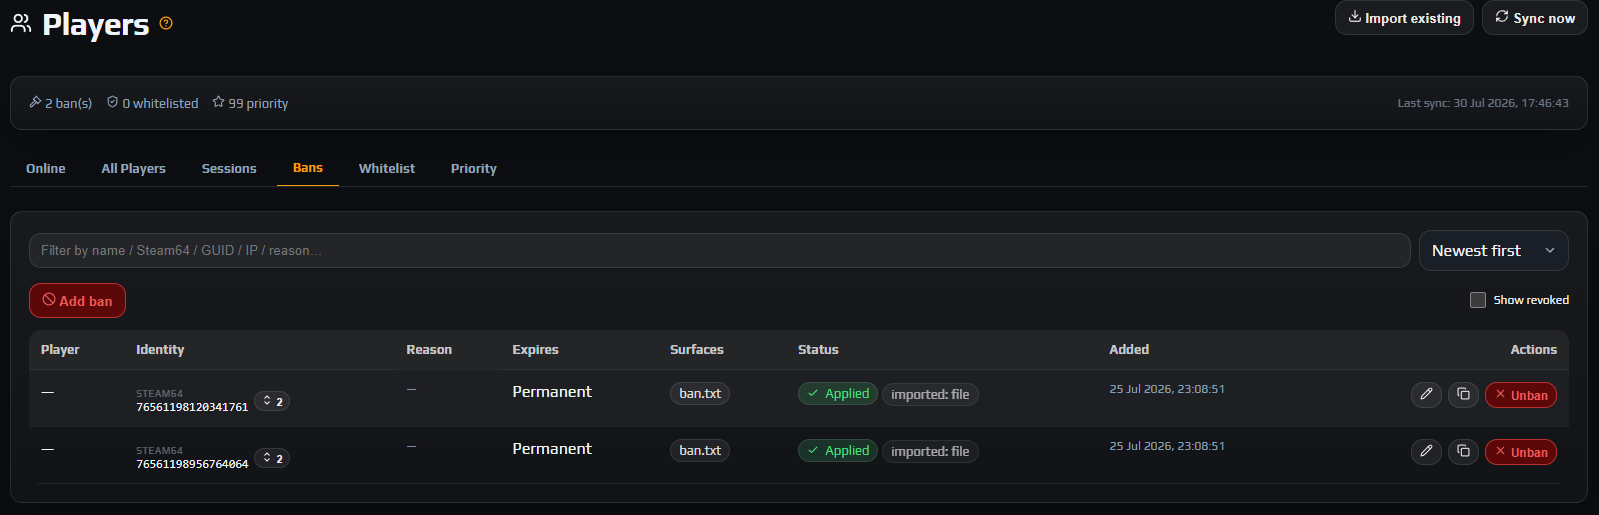
The Bans tab is the record. Add ban opens the ban panel with a Steam64 ID field, for banning someone who has never played here — a name passed to you by another community. Filter with Filter by name / Steam64 / GUID / IP / reason…, order by Newest first or Oldest first, and tick Show revoked to read lifted bans as history.
Expires reads Permanent, a countdown such as 18h left or 6d left, Expired, or revoked. Surfaces shows which files enforce it:
| Badge | Meaning |
|---|---|
ban.txt | The server-root ban.txt, read by the engine at startup. It has no concept of duration, so it carries permanent bans. |
BE | BattlEye’s bans.txt, with a minute count. BattlEye re-reads it on a live reload and kicks any matching connected player by itself — that is what makes a ban bite without you touching the console. |
A permanent ban therefore shows both badges and a timed ban shows only BE. That is expected, not a fault. Status is the sync chip: Pending until the node applies the change, Applied once the files are written, or Failed with the node’s error in the tooltip.
Per-row actions, all needing Manage bans & lists:
- A pencil icon opens Edit ban — change the Reason, or use Expires (leave empty = permanent) to shorten, extend or make a ban permanent without recreating it.
- A copy icon opens Apply to other instances, which lists every instance you can manage and reports each target as
created,merged,forbidden,notfoundorerror. - Unban revokes the entry, re-syncing immediately — the player can reconnect as soon as that lands.
Careful: Apply to other instances creates an independent entry on each target and there is no matching bulk unban, so lifting a network-wide ban means visiting each server’s Bans tab. Use it for cheaters, not for cool-off bans.
Note: Banning the same person twice does not create duplicates: an active entry matching any of their identities is updated in place and gains any new identity you supply. That is how a ban created from a BE-GUID on the RCON tab later fills in a Steam64.
7. Turn on the whitelist and seed the priority queue
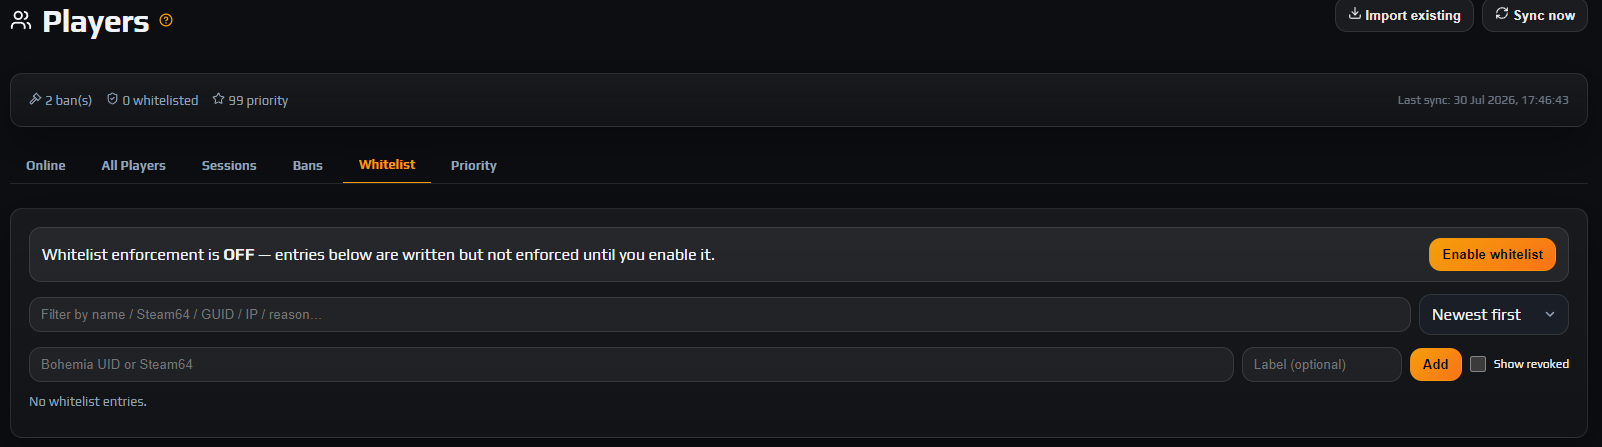
Whitelist. The tab opens with a banner reading Whitelist enforcement is ON or OFF; when it is off it adds that entries are written but not enforced until you enable it. Enable whitelist writes the setting into serverDZ.cfg, and the confirmation is explicit that it applies at the next server restart, because the engine reads that file at boot.
Data loss risk: Enabling enforcement on an empty list locks every player, including you, out of your own server at the next restart. Add your entries first. The panel does warn you — Enabling it will lock out EVERYONE until you add players. — but it will let you proceed. If it has already happened, add yourself on this tab and restart again; there is no in-game way back in.
Add a player by ticking Whitelist on their roster row, or here with the Bohemia UID or Steam64 field and an optional Label (optional). Either identity works — the panel resolves the form the file needs.
Priority. Priority entries let a player skip the join queue when the server is full, which is how you keep staff, donors and event hosts able to get on at peak hours. It needs no config switch, but it is Steam64 ID only: the add field accepts nothing else, and the roster button stays disabled until the panel has seen a Steam64 for that player. Label each one, or you end up with a column of anonymous 17-digit numbers.
Both tabs use the same row controls as Bans — the copy icon for Apply to other instances, and Remove to revoke. Removal re-syncs immediately, so a removed whitelist entry locks that player out on their next connection attempt.
Note: These lists are per instance, not per account: running several servers as one community, add someone once and then use Apply to other instances. Who on your team may do any of this is set under Members — see staff permissions and API keys.
Troubleshooting
RCON says Disconnected and will not connect
Why it happens. Usually the server is stopped, so nothing is listening on the RCON port. Otherwise the instance has never had an admin and RCON password saved, leaving the node with no RConPassword to authenticate with, or the server is mid-boot.
How to fix it. Check Overview reads Running and give a fresh boot a minute. If it is up and still refusing, stop the instance, open Settings → Server & RCON Authentication, save a password (4 to 10 characters, letters and numbers only), start it and try again.
I banned someone with a typed command and they are not in the Bans list
Why it happens. Typed commands go straight to BattlEye, which enforces and stores them in its own bans.txt. The panel had no part in it, so there is no entry, no reason and no expiry it can show you.
How to fix it. Click Import existing in the Players header and confirm Import & adopt. The ban appears with an imported: file badge and is manageable from then on. Next time, use the Ban button on the player row.
I turned the whitelist on and now nobody can join, including me
Why it happens. Enforcement is all or nothing: with it on, only the identities in whitelist.txt may connect, so a short or empty list locks out the whole player base at the next restart.
How to fix it. Open Players → Whitelist, add yourself and your staff — a Steam64 or Bohemia UID each — and restart so the change is read. If you were only testing, click Disable whitelist and restart; the entries stay, unenforced, for next time.
A ban entry is stuck on Pending, or shows Failed
Why it happens. Pending means the sync has not completed on the node, which is normal for seconds and abnormal for minutes. Failed means the node could not write the files, commonly because the BattlEye directory does not exist yet on an instance that has never been started.
How to fix it. Hover the Failed chip for the reason, then click Sync now to retry. On a never-started instance, start it once so the game and BattlEye directories exist, then sync. Repeated failures are worth a ticket with the tooltip text.
The Priority button is greyed out and the panel refuses my entry
Why it happens. The join queue is keyed on Steam64 and nothing else, so priority.txt accepts only that form. The panel refuses a Bohemia UID rather than write a line the server would ignore, and the roster button stays disabled for players it has never seen a Steam64 for — typically console players.
How to fix it. Use the 17-digit Steam64. If the roster has none yet, it will after that player’s next session. There is no priority equivalent for a Bohemia-only account; whitelisting them is the nearest thing available.
Frequently asked questions
Does my server have to be running for a ban to work?
No. A panel ban is written to the list files whether the server is up or down, and both the engine and BattlEye read those files at startup — a sync is queued just ahead of every start. The only part that needs the server up is the live reload that kicks a player who is connected right now.
Should I ban on Steam64, Bohemia UID or BE-GUID?
Steam64 whenever you have it. BattlEye’s GUID is derived from the Steam64, so one value covers both enforcement surfaces, and the panel fills in the other identities as it sees the player again. Ban on a BE-GUID when that is all the console gave you, and on an IP only as a supplement to an identity, never instead of one.
Can I ban a cheater from every server I run at once?
Yes. Open the ban on the Bans tab, click the copy icon for Apply to other instances, and pick targets or use All. Each target gets its own entry, reported back as created or merged. There is no bulk unban, so lifting it later means visiting each server.
Do bans and the whitelist survive restarts, updates and map changes?
Yes. The panel database is the source of truth and the list files are rewritten from it on every sync and ahead of every start, so a game update, a mod update or a mission change cannot quietly drop your bans. Lines the panel did not write are preserved rather than overwritten.
Do I have to keep the RCON page open?
Only for live actions. Kicks and messages travel over the open session, so the page has to be connected. Everything on the Players tab is stored server-side and applied by the node, so you can close the browser as soon as the entry is created.
How do I let a moderator ban players without giving them the keys to the server?
Add them under Members with View players and Manage bans & lists, and leave power, settings and file permissions off. They get the roster and the lists without being able to stop the server or touch its files, and every action is attributed in the Audit Log — see staff permissions and API keys. Add Use RCON too if they need the live console.