
Search the Community
Showing results for tags 'Persistence'.
Found 2 results
-
 You can move a DayZ server from another host to DZSERVERS.HOST and keep your world, your players’ bases and their characters. What carries all of that is one directory: your mission folder, with its storage_* persistence inside it. The order of work is: set the matching mission under Settings → Edit Mission, rebuild the mod list in the same load order under Workshop Mods, re-enter your serverDZ.cfg values in Instance Settings, then upload the mission over SFTP while the new instance is Stopped. Some things do not come with you, and it is cheaper to know that now than to discover it mid-cutover: bans, whitelist and priority queue have to be re-imported, your admin and RCON password is replaced, and mods run at whatever version the Steam Workshop publishes today. This runbook covers both halves. On this page Inventory the old server while you still have accessStop both servers, then download the mission folderPoint the new instance at the same missionRebuild the mod list in the same load orderRe-enter your serverDZ.cfg values by handUpload the mission and persistence over SFTPBoot it once and read the RPT before telling anyoneRe-import your lists, rebuild your schedule, then cut overTroubleshootingFrequently asked questions Before you start File access to the old server that you still control — its panel, FTP or SFTP. Get your copy before you cancel anything; plenty of hosts delete the files the moment a service lapses.A provisioned instance here. It is created automatically when your order completes, so there is nothing to build — see getting started with the control panel.Your SFTP details from the SFTP tab: host, port 2022, the per-instance username and the SFTP password. Connecting with SFTP sets that up.The same map on both ends. Bases and characters are stored per world, so moving from Chernarus to Livonia is a fresh start, not a migration.Somewhere with room to hold the download. A long-lived server’s persistence is commonly hundreds of megabytes. 1. Inventory the old server while you still have access Write five things down first. Every later step depends on one of them, and once the old service is gone none of them can be recovered. The mission folder name, exactly. Something like dayzOffline.chernarusplus. Copy the spelling and capitalisation from the folder listing, not from memory.The mod list, in load order. The authoritative source is the old host’s startup line: the -mod= and -servermod= arguments, read left to right. Note each mod’s numeric Steam Workshop id, because folder names are not always unique or searchable.The slot count the old server ran, so you can tell whether your new plan matches.A copy of serverDZ.cfg. You will not upload this file, but you will read values out of it in step 5.The list files from the old server root: ban.txt, whitelist.txt and priority.txt, if you used them. Careful: Do not cancel the old service on migration day. Keep it paid until the new server has booted, players have confirmed their bases and characters are intact, and it has run for a day. Overlapping billing for a week is the cheapest insurance in this process. 2. Stop both servers, then download the mission folder Stop the old server first. Then download, from the old host, the entire mission folder — not a selection of files inside it. Data loss risk: Never copy persistence out of a running DayZ server. The engine holds players.db open and rewrites the storage_* folder when it shuts down, so a copy taken live is a torn snapshot: characters from one moment, base state from another, and a database mid-write. Stop the old server, wait for it to fully exit, and only then start the download. Stop your new instance too, with Stop on Overview, and leave it stopped until step 7. This is what you are after, and roughly what it looks like: mpmissions/ dayzOffline.chernarusplus/ <- take this whole folder db/ globals.xml, economy.xml, types.xml, events.xml cfgeconomycore.xml cfgspawnabletypes.xml cfgplayerspawnpoints.xml cfggameplay.json init.c storage_1/ <- the persistence: bases, vehicles, characters players.db players.db-wal players.db-shm data/ Two files are easy to miss and matter: players.db-wal and players.db-shm are the write-ahead log and shared-memory index for players.db. Take the database without them and you can lose the most recent writes — which is to say, the last session everybody played. Note: You do not need the old profiles folder. It holds logs and working files, none of which carries world state. Keep the .ADM logs if you want your admin history. 3. Point the new instance at the same mission With the instance stopped, click Settings in the tab bar and scroll to Edit Mission. The Preset dropdown offers the three stock missions: PresetMapdayzOffline.chernarusplusChernarus — also the default when the field is emptydayzOffline.enochLivoniadayzOffline.sakhalSakhal Picking a preset just fills the Value box, and that box is free text. So if your old host ran a custom or renamed mission, type its exact folder name in Value instead of using a preset. Click Save mission. Clear empties the field and falls back to dayzOffline.chernarusplus. Careful: The mission value must match a folder name under mpmissions character for character. It is used verbatim to build the launch argument -mission=...\mpmissions\<value>, so dayzOffline.chernarusPlus with a capital P is simply a folder that does not exist, and the server will not load a mission. Note: Save mission and Clear are both disabled while the server runs — the panel’s tooltip reads Stop the server to change mission. Same rule as the rest of this panel. Edit Mission sets which folder under mpmissions DayZ loads — type a custom mission name straight into Value. 4. Rebuild the mod list in the same load order Open Workshop Mods. In the Add a mod card, paste a Workshop URL or its numeric id and click Lookup & add. The Add Workshop Mod panel opens, lists any Required dependencies pre-ticked, and Add to server queues the mod and its dependencies ahead of it. Repeat for every mod on your inventory list. Data loss risk: Copying the old server’s @ModName folders across does nothing. The panel builds -mod= and -servermod= from this table alone, so a mod that is not a row here is never loaded no matter what sits on disk. Add every mod through Workshop Mods. Then fix the order. The arrows in the Order column set the sequence, lowest first, and it must match what the old server ran: frameworks and dependencies first, content mods next, override and tweak mods last. Reordering saves immediately. The Enabled, Server-only and Auto-update checkboxes are drafts instead — click Save on the row to commit them. Installing Steam Workshop mods covers it in detail. Note: Rows badged Essential with a padlock come from the node template and cannot be removed, reordered or toggled. GameEventDispatcher, which feeds Live Map player positions and server FPS, is one of them — already installed, nothing to migrate. Careful: Mods install at whatever version the Workshop currently publishes; there is no way to pin an older build, here or on any other host. If your old server ran for months without updating its mods, you are updating them all at once during the migration. That is the most common reason bases come back missing. The Workshop Mods table is the only source of the load order — rebuild it to match the old host row for row. 5. Re-enter your serverDZ.cfg values by hand Open Settings again and work down the Instance Settings fields with the old serverDZ.cfg beside you: Host Name, Description, Max Players, Password, the time acceleration values, Disable 3rd Person, the Admin Log toggles, the network ranges. Every field maps to one real config key. Every serverDZ.cfg setting explained is the reference if a value needs interpreting. Click Save and look for Changes Saved!. Data loss risk: Do not upload the old serverDZ.cfg over the new one. The panel keeps its own copy of every setting the editor exposes and writes them into the file whenever you save, so a hand-uploaded file is silently overwritten the next time anything changes — and the old one carries the old host’s IP, ports and slot count. These lines belong to the panel and are rewritten on every single start, whatever the file says: hostIp = "..."; // your instance's bind IP hostPort = ...; // your game port a2sport = ...; // your query port a2sIpAddress = "127.0.0.1"; steamQueryPort = ...; // your query port maxPlayers = ...; // clamped to the slot count you purchased passwordAdmin = "..."; // from Settings > Server & RCON Authentication Anything the editor does not cover is yours to edit directly. Keys such as instanceId, the VoN settings, the login queue values and respawnTime are left untouched by the panel, so set them in serverDZ.cfg from the File Browser (Share → config) and they will stick. Last, set your admin password. In Server & RCON Authentication, type a value or click Regenerate, then Save password — 4 to 10 characters, letters and digits only. The old host’s password does not come across, and this one value covers both the in-game admin login and BattlEye RCON, so update any external admin tool you use. 6. Upload the mission and persistence over SFTP Confirm Server Status still reads Stopped, then connect with your SFTP client and open the mpmissions folder. Data loss risk: Nothing may be written into storage_* while the instance is Running. DayZ rewrites that folder on shutdown, so an upload under a live server is either ignored or flushed away, and writing into an open players.db can corrupt every character on the server. Stopped, always. Use SFTP, not the web File Browser, for this step: the browser caps uploads at 300 MB against 2.5 GB over SFTP, and storage_* alone usually exceeds 300 MB on any server that has been played on. Create the mission folder under its final name and upload into it, rather than uploading and renaming afterwards. Then reconcile the storage folder number. DayZ picks which one it loads from instanceId in serverDZ.cfg: instanceId = 1 loads storage_1. If the old host used a different value your download arrives named storage_5 or similar, and the new server will ignore it and generate an empty world beside it. Either name the incoming folder to match the storage_* folder your instance already has, or set instanceId to the old number. Careful: Keep the original download on your own disk untouched until the migration is confirmed. It is the only copy of the old world that exists, and the first attempt does not always take. Uploading over your source folder is a mistake you make exactly once. The mission folder, storage_* included, goes up over SFTP — 2.5 GB there against 300 MB in the File Browser. 7. Boot it once and read the RPT before telling anyone Click Start on Overview. The first boot after a migration is slower than normal: mods install, and the engine reads a persistence set it has never seen. Open the Live Logs card, set Stream to rpt and actually read it. What you are checking for: The mission loads. A run that ends without reaching the mission usually means the Mission value and the folder name disagree.No mod load failures. Cross-check any complaint against the Workshop Mods table for a Failed status or a Missing dependencies card.No flood of unknown-type errors. Those are types.xml entries naming items from a mod that is not in your list — a sign the mod list is incomplete rather than that the XML is broken. Editing types.xml and the loot economy explains the file. You are up when Server Status reads Running and Server FPS reports a number. Now verify in game rather than by inspection: copy your address with Copy next to Connect, join, and check three things — your own character arrived with its inventory, a base you know the location of is standing, and vehicles are where they were. Open the Live Map tab and confirm you show up on it. Careful: If bases are missing, stop the server before anyone plays. Every minute a wrong world stays live is a minute of new player activity written on top of it, and that makes re-uploading your download messier. The RPT stream is where a migration succeeds or fails — read it before announcing the new address. 8. Re-import your lists, rebuild your schedule, then cut over Bans, whitelist and priority queue do not travel with the mission folder, and they are the last thing standing between you and an unmoderated server. Upload the old ban.txt, whitelist.txt and priority.txt into the config share, overwriting the empty ones already there.Open Players and click Import existing. The confirmation is titled Import existing lists? and explains what it reads; confirm with Import & adopt. Nothing is deleted — entries already on disk are pulled into the panel so the two agree from now on.If you ran a whitelist, enable enforcement on the Whitelist tab. It applies at the next restart. Note: BattlEye’s own bans.txt lives outside the four shares, so GUID and IP bans held only there cannot be uploaded. Re-add those through the Bans tab, which writes both files for you — RCON, bans, whitelist and the priority queue covers it. Two pieces of housekeeping do not migrate either. Recreate your restart schedule in Scheduler with New task → Restart (controlled) — see automatic restarts with the Scheduler — and pick a frequency on Backups, where Daily suits most servers and everything is kept for 30 days (automatic backups and restore). Only then cut over. Your address has changed, so update wherever players find you: your community listing, your Discord, any launcher collection, and your DNS record if you use one. Overview gives you Direct Connect and List on DZSA Launcher links to share. Announce the new ip:port clearly, and leave the old host running with a message-of-the-day pointing at it for as long as you are paying for it. Import existing adopts the ban, whitelist and priority files you uploaded into the panel’s own lists. Troubleshooting My bases are gone after the migration but my character survived Why it happens. Characters and world objects load separately. players.db is self-contained so characters almost always survive, but built structures are stored as object classes and DayZ silently drops any object whose class the loaded mod set does not define. A missing mod, a mod present but not Enabled, or a mod republished since your old server last updated will each take every structure that mod provided with it. How to fix it. Stop the server before players build anything new. Compare Workshop Mods against your inventory list row by row: every mod present, Enabled ticked, the same order, Server-only matching. Fix the list, re-upload storage_* from the download you kept, and start again. If it was a version change rather than a missing mod, the author’s changelog is the only thing that will tell you what was renamed. The server starts but loads an empty world, or the wrong map Why it happens. Three variants of one mistake. The Mission value does not match the folder name exactly; or it matches but you uploaded into a differently named folder; or the mission is right and the storage_* number does not match instanceId in serverDZ.cfg, so DayZ ignores your persistence and generates a fresh world beside it. How to fix it. Open File Browser, set Share to mpmissions and read the folder name off the screen. Stop the instance, retype it into Value under Edit Mission, and Save mission. Then look inside the mission folder: if there are two storage_* folders, one is yours and one was generated, and the generated number is the one matching instanceId. I uploaded my old serverDZ.cfg and my settings keep reverting Why it happens. Instance Settings stores its values in the panel rather than reading the file, and writes them into serverDZ.cfg on save. On top of that the panel re-patches the IP, both ports, the slot cap and passwordAdmin immediately before every start. An uploaded file is overwritten by design, not by accident. How to fix it. Open the old file as a reference and type its values into the Instance Settings fields, then Save. Keys the editor does not expose are safe to edit in the file directly — the panel only ever rewrites the keys it owns. My old bans and whitelist are not being enforced on the new server Why it happens. The panel maintains its own copies of the ban, whitelist and priority lists and rewrites the server files from them. Files dropped into config without telling the panel are not part of that picture yet, and a whitelist file with no enforcement enabled is inert. How to fix it. Upload the list files into the config share, then click Import existing on Players and confirm with Import & adopt. Check the counts in the status band afterwards, then enable whitelist enforcement on the Whitelist tab and restart. My persistence upload fails or never finishes in the File Browser Why it happens. The web File Browser accepts single files up to 300 MB, which a mature server’s storage_* folder passes easily — and a browser upload of thousands of small files is slow and fragile besides. How to fix it. Use SFTP, which takes single files up to 2.5 GB. Details are on the SFTP tab and in connecting with SFTP. Keep the File Browser for the small XML edits afterwards. Frequently asked questions Will my players keep their characters, skills and inventory? Yes, as long as you bring players.db across with its -wal and -shm companions and load it on the same map. DayZ keys characters to a player’s Bohemia account id, which does not change between hosts, so a player who logs into the migrated world finds the character they left — position, health, inventory and all. Can I change map at the same time as migrating? You can, but it is not a migration. Bases, vehicles and characters are stored per world, so pointing the instance at a different mission gives you a fresh world with nothing in it. If you want both, migrate first, confirm the old world is intact, then change map later as a deliberate wipe — the old mission folder stays on disk. Can I just copy my whole old server folder across? No, and it would not help. You get four shares — profiles, mpmissions, config and mods — and the game binaries are outside them. Mods must be added through Workshop Mods because that table is what builds -mod=, and serverDZ.cfg is panel-owned. The only folder worth copying wholesale is your mission. How much downtime should I plan for? Budget two hours for a modded server and treat the transfer as the variable. Mission, mod and settings work is about fifteen minutes of clicking; moving the persistence takes as long as your own connection needs for a few hundred megabytes, doubled because you download it first. Do all the configuration before you stop the old server, so the only real downtime is the transfer. Does my admin and RCON password come across? No. It is replaced with the value in Server & RCON Authentication on your new instance, and the panel writes it into both passwordAdmin and BattlEye’s RConPassword on every start. Set it yourself or click Regenerate, then update every external admin tool and script that held the old one. Can I migrate a custom map such as Deer Isle or Namalsk? Yes. Add the terrain mod through Workshop Mods exactly as you would any other mod, upload the mission folder into mpmissions, and type its folder name into the Value box under Edit Mission — the field is free text, so it is not limited to the three presets in the dropdown. Everything else in this runbook is unchanged. Related guides Getting started with the control panelMaking a manual backup over SFTPinstalling Steam Workshop mods
 -
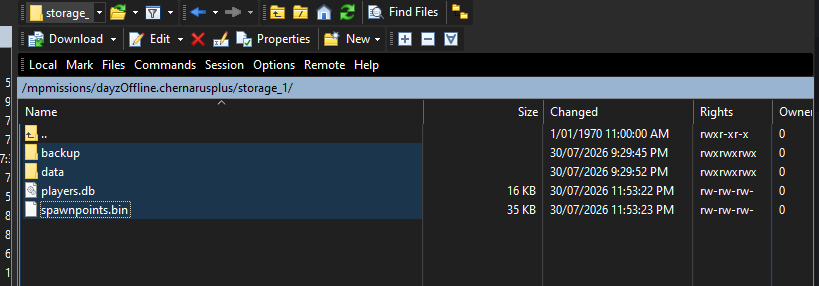 A manual DayZ backup is a copy of your mission folder pulled down over SFTP with the instance stopped: open the SFTP tab for the credentials, connect on port 2022, then download mpmissions/<world>/ including the whole storage_* folder and all three of players.db, players.db-wal and players.db-shm. That is the entire persistence set, and once it is on your own disk it is yours indefinitely. The Backups tab cannot do this for you. It has no create-now button and no download button, and its history is only 30 days, so an off-site archive, a snapshot taken minutes before a risky change, or a copy to load onto a test server is a job you do by hand. This guide covers doing it correctly — and the one mistake that turns the whole exercise into a corrupt file. On this page Stop the instance before you copy anythingConnect over SFTP and find your world folderDownload the whole world folderTake serverDZ.cfg and a record of your mod list tooVerify the copy before you start the server againDecide how many copies you keep, and for how longPut your own copy back when you need itTroubleshootingFrequently asked questions Before you start Your SFTP details: the Host, Port (2022) and Username from the SFTP tab, plus your SFTP password. Connecting with SFTP covers getting them and setting up a client.The Start / stop / restart permission as well as Read files. A copy taken while the server is running is not a backup, so you need to be able to stop it.A maintenance window. The instance stays down for the length of the copy — usually a few minutes, longer on a mature world.Free disk space locally, and somewhere sensible to keep the copy. A mature storage_1 folder is commonly a few hundred megabytes. The persistence set on a stopped DayZ server: players.db with its -wal and -shm siblings, plus the world data beside them. 1. Stop the instance before you copy anything This is the whole guide in one instruction. Do it first, and everything else is straightforward. Data loss risk: players.db is an SQLite database running in write-ahead log mode. Copy it while the server is running and you get a torn, stale or outright unreadable file — and copy players.db without its -wal sibling and you silently lose every write that had not yet been folded into the main file. Either mistake produces a backup that looks fine in your file manager and destroys your world the day you restore it. Stop the instance, wait for Server Status to read Stopped, and only then start the transfer. Click Stop on Overview. If players are online, run a Controlled Restart first so they are warned and can log out somewhere safe, then stop the instance once it is back up — restarting without rollbacks explains what an abrupt kill costs them. Wait for the status pill. DayZ flushes persistence as it shuts down, so a copy started while the process is still exiting can catch the world mid-write. Stopped means the handles are closed and the files on disk are the truth. Note: The panel’s own scheduled backups genuinely do not need downtime, and that is not a contradiction: the node takes a Volume Shadow Copy snapshot of the disk before it reads anything, so it gets a consistent point-in-time image while DayZ holds the database open. Your SFTP client has no equivalent trick — it reads live files one at a time. Wait for Server Status: Stopped before you begin the transfer — a hot copy of players.db is worthless. 2. Connect over SFTP and find your world folder Go to Instances → your instance → SFTP and take the Host, Port and Username from the Connection card — each has its own Copy button. The username is your panel username, a dot, and eight hexadecimal characters identifying this instance, so copy it verbatim rather than retyping it. Your session lands in a root holding exactly four folders: profiles, mpmissions, config and mods. Open mpmissions. Inside is one folder per mission world. The one you want is the value shown as Mission on Overview — dayzOffline.chernarusplus on a default Chernarus instance. If you have ever switched maps you will see more than one, and only the current mission is live; the others are old worlds sitting dormant. Open your world folder and you will find the mission configuration alongside a storage_* folder, normally storage_1. That storage folder is your persistence. Note: Nothing else on the server matters for a persistence backup, and the game binaries and BattlEye working directory are outside the four shares anyway — they cannot be reached over SFTP at all. 3. Download the whole world folder You can cherry-pick, but the reliable move is to drag the entire world folder to your local machine in one transfer. That captures all three of the things a restore might need, in the same layout the server expects them back in: What you are copyingWhat it holdsMatches the restore categorystorage_*/players.db plus -wal and -shmEvery character: inventory, position, health, stats.Players DBEverything else inside storage_*Built structures, vehicles, tents, buried stashes and other persisted world state.World DataThe world folder outside storage_*Your economy and mission config — the db folder, cfgeconomycore.xml, cfgspawnabletypes.xml and the rest.XMLs & JSONs & other(s) Laid out on disk it looks like this: mpmissions/ dayzOffline.chernarusplus/ download this whole folder db/ types.xml, events.xml, globals.xml cfgeconomycore.xml cfgspawnabletypes.xml storage_1/ players.db characters and inventory players.db-wal writes not yet folded into players.db players.db-shm data/ bases, vehicles, tents, stashes Drop it into a local folder named for the instance and the moment you took it — myserver-chernarus-2026-07-30-0300 — and leave the structure exactly as it came down. Do not rename anything, and do not delete the -shm file because it looks like scratch data. A copy that mirrors the server is one you can put back with a plain overwrite. Note: There is no size limit on SFTP downloads. The 2.5 GB ceiling applies to uploads only, so pulling a large world down is never the problem — pushing it back is where limits bite. Careful: Do not start the instance part-way through the transfer to “check it still works”. The moment DayZ boots it reopens the database and begins writing, and the second half of your copy no longer matches the first. Downloading the entire mission world folder in one transfer captures persistence and economy config together. 4. Take serverDZ.cfg and a record of your mod list too Persistence is the part you cannot recreate, but two more things are worth five seconds each while you are connected. serverDZ.cfg. It lives in the config share. The panel writes this file for you from the typed Instance Settings editor, so it is reproducible — but a copy is a plain-text record of every value you tuned, and it is the first thing another host or a local test server will want. Grab whitelist.txt, ban.txt and priority.txt alongside it if you use them. All of these are protected files: you can download and overwrite them, but not delete or rename them over SFTP. Your mod list. There is no export button, so make your own record. The Workshop Mods tab shows an Order column and each mod’s numeric Workshop ID — a screenshot of that table does the job, and the mods share gives you the same list as one @ModName folder per installed mod. Note: Record the mod set with the backup, not separately. Persistence written while a mod was installed contains that mod’s items, and restoring it onto a server that no longer runs the mod is how you get a world full of errors. Mods marked ESSENTIAL come from the node template and are always present, so you only need to note the ones you added. Careful: Do not plan on backing up and restoring mod payloads themselves. Mods are re-downloaded from the Steam Workshop when you add them by ID, and the upload filter rejects executable and script types outright (.exe, .dll, .bat, .cmd, .ps1, .sh, .msi, .scr, .com), so pushing a whole mod folder back does not end well. Re-add by ID and let the panel resolve dependencies — see installing Steam Workshop mods. A screenshot of the Workshop Mods table is your mod list of record — load order and Workshop IDs in one frame. 5. Verify the copy before you start the server again The instance is still stopped, which means this is the only moment you can re-take a bad copy for free. Spend a minute on it. Compare counts and sizes. Put the remote and local panes side by side on the same folder; the file count and total size should match. Most clients flag a transfer that finished with skipped files — treat any skip as a failed backup, not a warning.Confirm all three database files. players.db, players.db-wal and players.db-shm must be present locally if they are present on the server. After a clean shutdown the -wal may be zero bytes or absent, which is fine — what is not fine is it existing on the server and not in your copy.Check the storage folder is not empty. storage_1/data should hold real files. An empty storage folder means you copied a shell.Open one of the XMLs. db/types.xml in a text editor proves the text files came down intact rather than truncated.If you zip it, open the zip. Confirm the archive lists the storage_1 folder and the database files. An archive nobody has opened is not a backup. Careful: You find out a backup is bad on the one day you need it. Verifying now costs a minute; discovering it after a griefing incident costs your players their progress. Once you are satisfied, click Start on Overview and confirm Server Status reads Running and Server FPS reports a number before you tell anyone the server is back. A verified manual backup: the dated folder, the storage folder intact, and all three players.db files accounted for. 6. Decide how many copies you keep, and for how long The Backups tab is your short window — 30 days of node-side history, restored in place. Your own copies are the long window, and they only help if taking them is a habit. A rolling set. Three recent copies suits most communities. Take one, delete the oldest, keep moving.One before every risky change. An economy rewrite, a mod that writes to persistence, a map change, a version upgrade. Take it minutes before, not last night — the value is that it predates the change by as little as possible.One a month, kept. The copy that outlives the 30-day retention, and the one you will be glad of when something went wrong six weeks ago and nobody noticed.One before you leave. Moving hosts means taking a full copy while you still have SFTP access — see migrating a DayZ server to a new host. Store them in two places, one of which is not your gaming PC, and label each copy with the date, the world and the mod set. Sizes are modest — even a large world is usually a few hundred megabytes zipped — so a year of monthly archives fits on any cloud drive. Note: Automatic and manual backups are complements, not alternatives. Leave the Backups tab on a real frequency for the fast, frequent, category-level rollbacks it is good at — automatic backups and restore covers those — and keep your own copies for depth, portability and anything older than a month. 7. Put your own copy back when you need it Restoring your copy is the download in reverse, with the same rule at the front of it. Data loss risk: Stop the instance and wait for Stopped before you upload a single file. A running DayZ server holds players.db open and rewrites the storage folder as it goes and again on shutdown, so an upload under a live server is either refused on a locked file or flushed away the next time the server saves — and a partial write into an open database can corrupt every character on it. Stop the instance on Overview and wait for Server Status to read Stopped.Connect over SFTP and navigate to mpmissions/<world>/ — the same world folder you took the copy from.Upload your saved folder over the top, letting your client overwrite. Take players.db, players.db-wal and players.db-shm together, from the same copy, in the same transfer.Click Start and check the thing you restored actually looks right in game before you announce that you are back. Data loss risk: Never mix files from different copies. A players.db paired with the -wal from another snapshot describes a state that never existed, and SQLite will either refuse it or apply writes that do not belong to it. One copy, all three files, one transfer. Two limits shape the upload. SFTP takes single files up to 2.5 GB; the web File Browser stops at 300 MB, and a mature storage folder routinely exceeds that, so the browser uploader will reject exactly the files you most need to put back. And nothing on the server unpacks archives — there is no extract feature in the File Browser or over SFTP — so upload the unzipped folder tree, not the zip. Careful: An upload overwrites what it matches and leaves everything else alone, so files that exist live but not in your copy survive the restore. For a true replacement rather than a merge, delete the files inside storage_* first — that needs the Delete files permission and is irreversible, so only do it when you mean to discard the live world. Note: If the copy you want is one the panel took rather than one you took, you do not need SFTP at all — use Restore on the Backups tab, which lets you put back Players DB, World Data and XMLs & JSONs & other(s) independently. Automatic backups and restore walks through it. Restoring a manual backup: upload the unzipped folder over the top with the instance stopped, overwriting in place. Troubleshooting My downloaded players.db is a different size to the one on the server, or it will not open Why it happens. It was copied while the instance was running. SQLite in write-ahead log mode is being written to continuously, so a live read catches the file mid-transaction and produces something torn or stale. Your file manager has no way to tell you this — the file looks perfectly normal. How to fix it. Delete the bad copy so you never restore it by accident, stop the instance, wait for Stopped, and take it again. If you cannot stop the server right now, use the Backups tab instead: the node snapshots the disk first, so its automatic backups are consistent even with players online. I restored my own backup and players lost the last few hours of progress Why it happens. Almost always a missing players.db-wal. The write-ahead log holds committed changes that have not yet been folded into players.db, so a copy of the main file alone rolls back to whenever the last checkpoint happened. Copying while the server was running produces the same symptom. How to fix it. Restore again from a copy that includes all three files, taken after the instance reported Stopped. Going forward, download the whole storage_* folder rather than picking files out of it — then there is nothing to forget. The File Browser will not upload my storage folder back Why it happens. The web uploader caps a single file at 300 MB and oversized files are skipped and reported in the upload summary. A mature storage_1 folder frequently contains files past that, and there is no extract feature to work around it by uploading a zip. How to fix it. Use SFTP, which takes single files up to 2.5 GB. This is exactly the case SFTP exists for — see connecting with SFTP. Upload the unzipped folder tree; nothing on the server can unpack an archive for you. Downloading a file in the File Browser fails with File too large to read Why it happens. The web file manager reads a file into memory to serve it, and that path is capped at 50 MB — the error reads File too large to read (>52 MB). players.db on a busy server passes that within weeks, and the world data usually already has. How to fix it. Take it over SFTP, where downloads have no size cap at all. Use the File Browser for reading logs and editing XML, and SFTP for anything binary or bulky. The transfer finished but some files were skipped or refused Why it happens. Three limits look alike from the client. Downloads need Read files on your Members grant, uploads additionally need Write files, and the upload filter rejects .exe, .dll, .bat, .cmd, .ps1, .sh, .msi, .scr and .com outright. How to fix it. Read your client’s transfer log and find the first failure rather than the last, then check the extension and your permissions under Members. Never treat a partially completed transfer as a backup — delete it and start over. Frequently asked questions Do I really have to stop the server to copy players.db? Yes, if you want the copy to be usable. players.db is an SQLite database in write-ahead log mode that DayZ holds open and writes to continuously, so reading it live gives you a torn or stale file. The panel’s scheduled backups avoid the problem a different way — the node takes a Volume Shadow Copy snapshot of the disk before reading, which is why those need no downtime and a hand-made copy does. Which files exactly are the persistence? Everything under mpmissions/<world>/storage_*/. That is players.db with its players.db-wal and players.db-shm companions, which hold every character and inventory, plus the rest of the folder, which holds built structures, vehicles, tents and buried stashes. Your economy and mission config — db/types.xml and friends — sits one level up in the world folder and is worth taking in the same pass. Can I download one of the panel’s automatic backups instead? No. Automatic backups live on the node and are only ever restored in place, so the Backups tab has no download button and no create-now button. A copy on your own disk has to be taken over SFTP, which is also what removes the 30-day retention limit — a file you have already downloaded is yours for as long as you keep it. Can I zip the folder on the server before downloading it? No — there is no compress or extract feature in the File Browser or over SFTP, in either direction. Download the folder as it is and compress it locally afterwards if you want a single tidy archive. The same limitation is why a restore has to be an upload of the unzipped folder tree rather than a zip you unpack on the server. How often should I take a manual backup? Immediately before anything risky, and on a light routine otherwise — three rolling copies plus one a month kept as an archive covers most communities. The automatic Backups tab already handles frequent, recent rollbacks, so your manual copies exist to cover the two things it cannot: getting the data off the node, and keeping it longer than 30 days. Can I load my copy onto a local DayZ server to test something? Yes, and it is one of the better reasons to keep manual copies. A DayZ server you run yourself uses the same mpmissions/<world>/storage_* layout, so the folder drops straight in with the local server stopped. Match the mod set as closely as you can — persistence written with a mod installed expects that mod to still be present — and treat the result as a sandbox, not a mirror. Related guides Getting started with the control panelAutomatic backups and restoreconnecting with SFTP